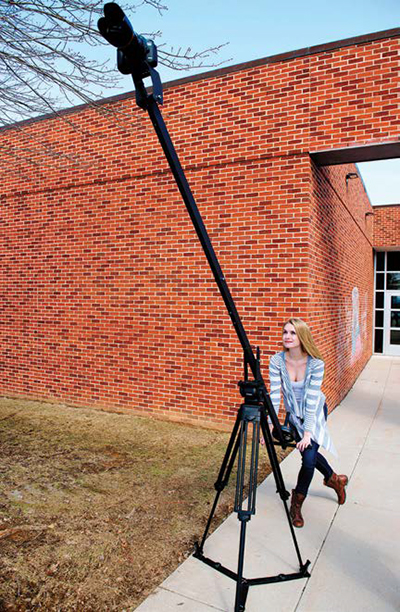
The Orion DVC200 Jib

The Orion DVC200 jib in use
FEATURES
With its street price of less than $300 (and $119 more for the four-foot extension), you can boldly raise your DSLR to new heights. It’s incredibly easily to assemble; in less than 30 minutes after opening the box you can have a functioning jib.
The Orion jib comes with a front section, back section, two places to mount counterbalancing weights (either vertically or horizontally) and a camera mount. If you have a longer camera and lens (such as Canon’s EOS C100) you might want to use the extension plate.
The aircraft aluminum construction that Pro-Am uses is strong, yet lightweight enough to provide easy maneuverability. There are some unique features to this model that make it even more suitable for beginning operators. Balancing is simple as you have two options as to where to place the weights. If they’re placed on the side (horizontally mounted), the operator can control the jib by grabbing the bar on both sides. I should note that the clips holding the barbell-type weights in place are difficult to attach and remove, requiring a bit of forearm strength. If you mount the weights vertically, they easily slide onto the protruding bar.
If you control the Orion jib by its handle, then you may use the wingnut screw to keep the camera stable in auto-tilt mode. With the screw in place, the camera remains level to the ground when lowering or raising the jib. If you remove the screw, then you’re in manual tilt mode, allowing the camera to move independently of the jib’s body.
IN USE
With five other jibs in our equipment cage, the Orion’s arrival sparked a lot of interest. My students very quickly figured out the balancing details and then mastered a multitude of jib movements. This is one of the few jibs I’ve seen that can be set up, moved around and operated with minimal assistance. No one really knows what type of jib you used when they view the end result, but the Orion helps in making the shots easier to achieve and getting the camera to new vantage points.
When setting up the jib, make sure it’s mounted on a sturdy and heavy-duty tripod. The moving jib places a lot of torque where it is attached to the tripod and I quickly found out that the lighter weight model I tried first wasn’t up to the task. I switched to a more robust tripod (Vinton blue), making sure that I used both mounting screws to attach the jib to the tripod plate. Also, you will need to check tightness often as the screws do work themselves loose.
I don’t recommend using the auto-tilt mode that keeps the camera level as the jib moves. Although this makes things easier for a one-person shooter/crew, the camera remains rather awkwardly stable as the jib rises or lowers. I personally prefer the manual mode where the camera moves in tandem with the jib. However, be aware that in this mode the camera can easily drop forward—especially when using larger and longer lenses—if you leave the jib unattended (something you really shouldn’t do anyway).
To balance the Canon EOS 5D Mark III used for this evaluation, only a five-pound counterweight was needed on each side of the jib. (The same amount of weight worked perfectly when mounted on the vertical bar.) All of our shots had the smoothness associated with a jib, but I did encounter difficulty in seeing the LCD screen on the camera when the jib was extended. (A three-inch viewing screen at a distance isn’t a good match for older eyes.) I would definitely recommend purchasing the optional LCD monitor bracket and swivel as it allows anyone with eyes over 20 years old to see the movement more clearly and act and react accordingly. All in all though, my students and I were well pleased with the jib.
SUMMARY
At the Orion DVE200’s price point, we will be adding several to our equipment cage. As it requires only about a third of the setup time required for our other jibs, handles most of the cameras we use and is easily transportable to each location, there isn’t really much to complain about.
As with any jib, make sure the tripod’s placement is secure and that the controls for the jib’s three axes of movement are tight enough to offer slight resistance.
You won’t add smoother camera movement to your shots with anything else that costs this little. The next step is to see how it survives in the wild, i.e., a few semesters of student use.
The Orion provides an inexpensive way for smaller crews to add jib shots to their productions in any location. Its quick setup and teardown, short learning curve and ability to allow videographers to make maximum use of DSLRs makes this jib a must have.
Chuck Gloman is chair and associate Professor of the TV/film department at DeSales University. He may be contacted atchuck.gloman@desales.edu.
FAST FACTS
APPLICATION
Camera shots that wouldn’t be possible with standard support gear
KEYFEATURES
Three axes of movement, manual and auto-tilt modes, sturdy construction, extensions for a longer reach and portability
PRICE
Jib, $280; Four-foot extension, $119; LCD monitor bracket and swivel, $16
CONTACT
ProAm USA
864-845-1144
www.proamusa.com
Get the TV Tech Newsletter
The professional video industry's #1 source for news, trends and product and tech information. Sign up below.
Chuck Gloman is Associate Professor with the TV/Film Department at DeSales University.

