Triveni Streamscope Portal
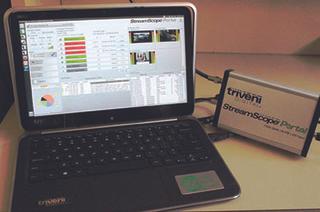
The Triveni Streamscope Portal and capture box
Even though I’ve been in this industry for more than three decades, it’s still exciting to see test gear that makes troubleshooting easier. I remember buying my first VOM, performing field mods to change waveform monitors from tube to solid-state operation and the first spectrum analyzer that was assigned to my department. I especially remember the first time I saw a stream analyzer. Although stream analyzing gear has not been around as long as I have, if your plant has an early-generation stream analyzer (or none at all) you’ll likely be interested in the latest offerings from Triveni Digital, their StreamScope Portal.
FEATURES
The StreamScope Portal, as tested, consists of the latest Dell laptop/tablet (which serves as an MPEG analyzer) and an ASI/ATSC capture box.
The Linux OS tablet weighs about 3.3 pounds, has a 12.5-inch 1080 pixel (HD) touch-sensitive screen and 4G dual-channel RAM with a 128 GB solid-state drive. Available connectivity includes Bluetooth 4.0, USB 3.0 X2, and a 20-pin mini display port. Supported inputs include GigE, file-based (MPEG-2/4) and RF/ASI via the external capture box. Power is supplied by a 45 Watt AC adaptor and six-cell lithium ion battery. The keyboard is full-size, and for sound there are microphone/headphone I/O’s, along with dual on-board speakers.
The capture box measures about 1.5 x 4.5 x 6.5-inches and weighs about three-quarters of a pound. This capture box (as tested) has separate inputs for both ASI (BNC) and ATSC (“F” connector), with status LED’s for both on the front. Located on the back is a USB connector for connecting with the tablet and a status LED for that USB connection.
The StreamScope Portal system provides both real-time and file-based MPEG analysis, which is configurable and rule-based by ATSC, cable, and DVB-SI standards. Tests include verification of PSIP/PSI/SI/ESG accuracy, PCR jitter analysis, testing of video and audio buffering, EPG metadata, EAS messages and MPEG section analysis. Other features include PAT/PMT cross-table consistency analysis, manual or triggered transport stream recording, live rendering, audio loudness metadata and graphs, as well as drill-down dashboards.
IN USE
After unpacking the StreamScope Portal, I seemed to have everything I needed: PC, capture box, power supply, USB cable and a seven-sheet quick-start guide. I attached the power cord to the PC, as I never try to operate any new device the first time from battery power.
I connected the USB cable between the tablet and capture box, observing Triveni’s directions to use a specific tablet USB port.
To get a signal into the capture box, I connected a rooftop antenna via RG-6 cable to the “F” connector. I then pressed the power button and got a log-in screen. Using the supplied “super-secret” password, I was soon able to get to the desktop.
On the left was the StreamScope Portal client icon. Clicking on that brought up an “initializing interfaces” status indication. After that box closed, I was taken to the StreamScope Portal control screen. It was at this time that I turned my attention from the quick start guide.
At the screen’s top left, I selected USB/RF as an input. (Choices included File, USB: RF, USB: ASI, and IP “225.1.1.165:xx”). Just below this information box was a spot for selecting ATSC as the Analysis Mode. Below that was an area with VTR-like labels: Play, Pause, Reset and Rec. The screen also includes an SNR meter and Config buttons. Pressing the latter brought up the Configure Input screen, which included Add Channel, Remove Channel and Auto Scan areas (very similar to what’s found on today’s DTV receivers).
Pressing Add Channel brought up a dialog box with input regions for Modulation (I selected 8-VSB), Tuning Plan (I chose Std) and Channel (I entered 32—my station’s channel number). Pressing the Yes button brought me back to the Configurations Screen. There in the list to the right ready to be selected was Channel 32. Once I did this, the data fields begin to populate, Modulation Type, Tuning Plan, Thumbnail Speed, Dialnorm Deviation and Dialnorm Value.
I then pressed the “Auto Scan” button and went for coffee. When I returned, there were six or so primary channels added to the list. I put a check mark in the box next to CH 32 and pressed Play. The center-left screen populated information about 32, including transport level, MPEG-2 tables, PSIP tables, cross-table analysis, audio and video Errors. On the right side of the screen, there were three video programs running.
Off to the left appeared additional “view” tabs, including the default transport summary, service details, status tree, cross table and logging. Another assignable monitoring window appeared near the bottom left of the screen with detailed tabs including PIDs table, programs, status tree, data, categories, logs and “PIDs Pie.”
I selected the Service Details tab which yielded Custom, Overview, A/V, Bitrates, Buffers, LKFS, PCR and Video Wall.
There were several areas for various alarm triggers on the user-selected stream. These included MPEG-2 tables, PSIP tables and cross table analysis. I had a look at all of the stations in my area and noticed some “red” boxes being indicated in all of their streams which indicated alarm conditions. Drilling a little deeper, I found that selecting each box on the Status Tree display allowed me to adjust alarm parameters. Although standards are standards, I imagine that each user might have different requirements for an alert condition trigger in a given area.
Recording a stream (program) was easy. You simply press “record” while a program is selected. To play it back, you just select the file menu at the top left of the screen. Next, pressing Config (just like scanning for channels) brings up a familiar file selection screen, and under User Recordings you’ll find your recording. There’s also a Triggered Recordings feature (this is found one step up from User Recordings). Once you select your file, just press play in the playback area.
SUMMARY
I kept the StreamScope up and running for several weeks of evaluation. There were never any issues with connectivity or setup, and I used the “drill-down” evaluation method on all windows, including PCR measurements on my own channel.
While no sensitivity specs are given, the unit received distant channels as well or better than the DTV set in my office. Test provisions for closed captioning were noticeably missing; however, a Triveni spokesperson informed me that a CC function will soon be released as a standard feature.
For a portable device, the analyzer’s twopiece design is a bit clunky, in my opinion. While I do prefer the design over a proprietary “one box” system, it’s a bit awkward to cable up and carry around separate laptop/ tablet and capture box units. Perhaps (taking a hint from the bonded cellular companies) a small satchel or pack contrivance might be in order, as we all really hate dealing with cords and connectors.
Joey Gill is chief engineer at WPSD-TV in Paducah, Ky. and has been with the station for 30 years. He has worked in television since 1977. He may be contacted atrespond2jgill@yahoo.com.
FAST FACTS
APPLICATION
Detailed examination of a digital television stream’s parameters
KEY FEATURES
Easy-to-use, small profile, provides much detailed information
PRICE
MSRP: Basic unit, just under $10,000, as tested: about $15,000.
CONTACT
Triveni Digital
609-716-3500
www.trivenidigital.com
Get the TV Tech Newsletter
The professional video industry's #1 source for news, trends and product and tech information. Sign up below.
