Equalization: Overtones And Equalizers

Last month, I began a series of columns on the illustrious subject of EQ (also known as equalization), or the art of manipulating timbre. In this issue, I'll be writing about overtones and how we approach dealing with them using an equalizer.
THE IDEA OF OVERTONES
When we perceive a musical pitch, a trumpet playing A above middle C for instance, we perceive an unequivocal and singular construct of a musical entity. For reasons that are beyond the scope of this column, we don't hear it as a collection of various frequencies. However, that's just what it is. They are called overtones or harmonics and are a central conceptual building block of any resonating or vibrating system.
When such a system vibrates, it does so not just at its basic, or fundamental frequency, but at all frequencies that it physically can. These are generally related, mathematically, to that fundamental frequency as what are called "whole-number integers." If we call the fundamental frequency "F," then the overtones will tend to occur at 2F, 3F, 4F, 5F and on up, ad infinitum. There can be hundreds of overtones present in a particular note or sound.
THE OVERTONE SERIES
The lower reaches of the overtone series constitute a complex chord that is basically a dominant seventh chord based on the fundamental, spread out over three octaves. Let's consider low A (110 Hz) for a moment. The fundamental (F) = 110 Hz, 2F = 220 Hz, 3F = 330, 4F = 440, 5F = 550, 6F = 660, 7F = 770 and 8F = 880. It goes on up from there of course. So, 110 Hz, is an A, 220 is also A (an octave up). 330 is an E, 440 is another A, 550 is a C, 660 is another E, 770 is a G and 880 is another A. Whew!
We can train ourselves to hear these individual overtones with practice, (I once had a conductor, during an audition, tell me that I had the loudest fifth overtone he'd ever heard), but we tend not to hear them that way due, I suspect, to the fact that they are phase-locked.
Here's the point: the part of timbre we are concerned about in this column is determined by the relative loudness of these various overtones. Each instrument, each note will have a different distribution of loudness of the various overtones. We call that distribution the timbre of the note, the instrument.

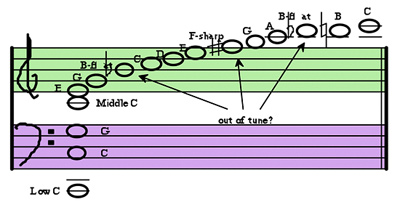
Fig. 1: Grand Staff showing first 16 harmonics from Low C to High C, with annotations for the ambiguous tuning ones. Fig. 1 is a graphic from my book "Total Recording," showing the first 16 harmonics of a Low C (ca. 65 Hz).
IN THE UPPER OCTAVES
If you were really alert, you may have noticed that there are twice as many harmonics present in each successive octave. By the time we hit the fifth octave above the fundamental, there 16 overtones present in that octave, while by the eighth octave there are 128 overtones present! Beginning in that fifth octave, there are more overtones than musical pitch frequencies, so we say that the overtones have become microtonal. They begin to be a wash of spectral energy, readily suitable for equalization.
At the same time, that wash of spectral energy responds to the specific resonances of the instrument itself, regardless of the pitch fundamental. At the same time, it also responds to resonances present in the microphone (and there are usually many). Some of those resonances turn out to be undesirable, subjectively speaking. And here's where the art of equalizing begins.
USING A PARAMETRIC EQUALIZER
The first thing we wish to do when equalizing an individual source (say, a voice track) is get rid of the problems inherent to the track. Those problems will mostly be some of these narrow, closely-spaced resonances. First, we search for them, and then, after we find them, we attenuate them. The search usually involves reducing the equalizer's input level by about 10 dB and then cranking a high frequency equalizer band up to its maximum (+18 dB) at a narrow Q (say 12-15, 1/10th of an octave or less). Then, starting at about 10 kHz, slowly sweep down and listen for resonances that sound both pronounced and wrong. This is a subjective activity, and you've got to practice at it and learn to trust your ears.
When something jumps out at you, zero in on it, narrow the Q as much as you dare, and then change that +18 dB boost to about –3 dB cut. Let your ears rest for a moment, raise the input level back to reference, and audition your effort, switching the EQ in and out. If you've done it well, you will hear hardly any change.
You keep repeating this, continuing to sweep downward to about 1600 Hz, notching out the troubling resonances. There will usually be between two and six such resonances.
Then do the same for low frequencies, between about 110 and 225 Hz. Here we are listening for room modes that may be swamping the low frequencies. Be careful in this range to not take out a resonance that is just a natural part of the speaker's or instrument's sound or a specific musical pitch. It takes gentle care.
When you're done, the track should sound cleaner and smoother, as well as a little more natural. You aren't done yet, and the voice isn't fully equalized, not by a long shot. But this is a good start.
One interesting thing about this is that all these cuts don't change the overall level of the track at all. While boosts will increase track level, cuts don't decrease the level. Interesting, eh?
THE MEANING OF IT ALL
The management of these very small bands of overtones is a key element in the process of high quality equalization. It is a great place to start in learning how to equalize well. When you cut very narrow bands by very modest amounts (2–4 dB), it can't do a great deal of damage at worst, and as you get the hang of it, you'll notice that your tracks are getting far more natural sounding, as I said earlier.
Next column, we'll discuss what to do next: how to enhance and polish the sound that has had most of its worst warts removed or at least smoothed.
Thanks for listening.
Dave Moulton is enjoying spring. What a doofus! You can complain to him about anything at his Web site,www.moultonlabs.com.
Get the TV Tech Newsletter
The professional video industry's #1 source for news, trends and product and tech information. Sign up below.

