JVC’s GY-HM650 - FULL ARTICLE
JVC’s new GY-HM650, using V2.0 firmware (a no-charge update), has the following capabilities: 23X Fujinon autofocus zoom lens with manual functions (F1.6-3.0, f=4.1mm-94.3mm [35mm conversion: 29mm-667mm]); four-position ND filter (off, 1/4, 1/16, 1/64); optical image stabilizer; three 1/3in, 1920 x 1080, 2.07MP, 12-bit sensors; F11 sensitivity; flash band correction; 0.45in 1.22MP viewfinder; a 3.5in 920K-pixel LCD display; and SDXC/SDHC memory card recording (two slots for dual-backup or continuous recording).
Other features include: Retro mode (20 seconds); interval (time lapse) recording; built-in stereo microphone; 2-channel XLR balanced audio inputs (mic/line switchable) with phantom power supply; built-in GPS; TC in/out, both HD/SD-SDI and HDMI outputs; and wired remote control connector (LANC/Control-L).
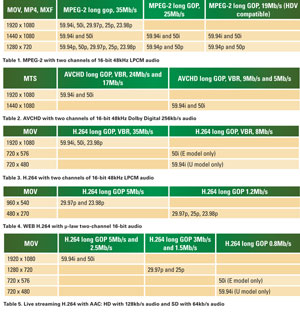
The camera can capture 1920 x 1080, 1440 x 1080, 1280 x 720, 720 x 576, 720 x 480, 960 x 540 and 480 x 270. The first three are HD formats; the second two are SD formats (PAL and NTSC), and the fifth and sixth are resolutions used for Internet operations.
JVC’s FALCONBRID chip supports multiple codecs. Tables 1, 2 and 3 present the three codecs and the supported frame sizes and frame rates.)
MPEG-2 streams can be wrapped as MOV (a QuickTime file ready to edit with Apple’s Final Cut Pro), as MP4 (XDCAM EX file compatible) and as MXF (AS-10: MPEG-2 MP@ML and MPEG-2 422 HL). Note: MXF is not available for 720p recording.
The camera’s ability to shoot 59.94p, 50p and 25p at 720p provides under-and over-cranking for 29.97p recordings. Of course, if you are working with 1080p, you’ll need to up-rez the 720p recorded media.
AVCHD (MTS file) recorded clips can be edited directly or converted before or during import as another format such as ProRes. (See Table 2.)
Likewise, H.264 (QuickTime MOV file) recorded clips can be edited directly or converted before or during import. (See Table 3.)
Table 4 presents the 5Mb/s and 1.2Mb/s H.264 format used as proxy “WEB” video.
The HM650’s dual SDHC/SDXC card slots can be used to record two different formats. Five options are available: HD and SD (NTSC or PAL); HD and 1440 x 1080 AVCHD; HD and 960 x 540 H.264; and HD and WEB video (480 x 270).
All (any) format clips can be transferred using FTP to a server. Before a transfer, clip(s) can be trimmed using the HM650’s clip trimmer.
Table 5 presents the 5Mb/s, 2.5Mb/s, 3Mb/s, 1.5Mb/s and 0.8Mb/s H.264 formats used for real-time streaming to a server.
Although the HM650 specifications provide an understanding of the camera, a more useful way to understand the camera is to examine the ways it can be employed.
Camcorder
While multiple formats can be recorded to SD cards, in most cases one of two MPEG-2 formats will be utilized: MOV (a QuickTime file ready to edit with Apple’s Final Cut Pro) and MP4 (XDCAM EX file compatible). Frame size will be likely to be 1920 x 1080 at 59.94i, 50i, 29.97p, 25p and 23.98p. The other likely used alternative is 24Mb/s AVCHD at 59.94i or 50i. (Note: 1080/59.94p and 1080/50p are not supported.
There are two ways to move media to your PC/Mac. Perhaps the simplest option is to eject an SD card from the camera and insert it into your computer. The other option is to use a USB cable to connect your computer to the camcorder. When you use a USB connection, SD card(s) in the camcorder mount on your computer’s desktop.
No matter how media becomes available on your computer, depending on your NLE, you will be able to directly access MPEG-2 (MOV files) and AVCHD clips (MTS files). JVC’s ProHD Clip Manager should be used to manage MP4 clips.
Remote camera control
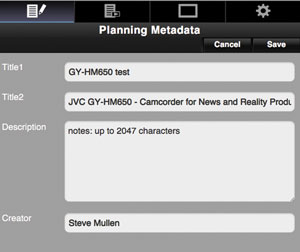
Figure 1. Remote metadata setting
The HM650 firmware supports a “browser” mode. In this mode, many camera functions can be accessed remotely using a computer, tablet or smartphone browser. Either a USB-to-Ethernet adaptor or a WLAN (Wi-Fi or cellular modem) adaptor must be plugged into the camera’s USB HOST port. These adaptors are used to transfer data to/from the browser. My review unit was shipped with an installed Wi-Fi adaptor. JVC also sent me a Verizon cellular modem.
Plug the Wi-Fi adaptor into the camcorder. Multiple steps must be accomplished using the HM650’s menu system to establish a connection to a local Wi-Fi network:
- System > Network and select either On(HDMI Off) or On(SDI Off).
- System > Network > Settings > Web Access to On.
- System > Network > Settings > Connection Setup > Wizard, then select SET.
- “Wireless LAN” will appear on the screen. Select Next.
- Select Connect with Access Point. Select Next. (When used in Access Point mode, the camera will use an existing Wi-Fi network.)
- The HM650 will search for a Wi-Fi network. For example, “DVC.” Select Next.
- Set “Use DHCP to connect.” When connected, “Successfully Connected” will appear. Select Next.
- Set “Use No Proxy.” Select Next to finish the Wizard.
- Press the HM650’s STATUS button to see the camera’s IP address — such as 192.168.#.#.

Figure 2. Remote white balance control
Enter the camera’s IP address into a browser, e.g., http://192.168.#.#. Enter the camera’s name and password. The browser will display the HM650’s user interface. (To define the camera’s name and password, use System > Network > Settings > Camera Name and Change Password.)
To establish a connection to an existing cellular account, first plug the cellular modem into your computer. Download the appropriate cellular software. I downloaded Verizon’s VZAccess Manager at www.vzam.net. Using the software, establish and test the connection. The cellular modem’s IP address will be 10.0.#.#.
Plug the modem into HM650’s USB HOST port. Next, define the camera’s transfer settings:
- System > Network and select either On(HDMI Off) or On(SDI Off).
- System > Network > Settings > Web Access to On.
- System > Network > Settings > Connection Setup > Wizard, then select SET.
- “Wireless LAN” will appear on the screen. Select Next.
- Select Connect with P2P. Select Next. (When used in point-to-point [P2P] mode, the camera creates its own Wi-Fi network.)
- Set to Manual.
- Enter an SSID (for example, “HM650”) and an eight-character Passphrase. Select Next.
- Press center button to complete Wizard.
- Press the HM650’s STATUS button to see the camera’s IP address — such as 10.0.#.#.
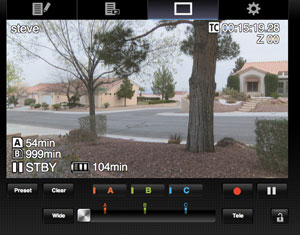
Figure 3. Remote zoom control at wide
Enter the camera’s IP address into the remote browser, e.g., http://10.0.#.#. Enter the Passphrase. The browser will display the HM650’s user interface. The user interface can be presented on a PC/Mac, a tablet or a smartphone. The device’s browser is employed to access the interface. On my Mac, I used Safari. (Safari is also used when the device is an iPhone or iPad.) I used Chrome on my Samsung Note 2.
You can remotely create and edit metadata. (See Figure 1.) Several of the camera image controls are adjustable, including: User button enable/disable, Full Auto on/off, AE level, gain setting, iris setting, shutter speed setting and white balance. (See Figure 2.)
The remote camera’s user interface also provides control of zoom — with three presets — and focus. (See Figures 3 and 4.)
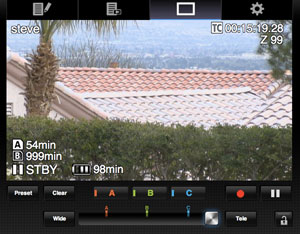
Figure 3. Remote zoom control at wide
I placed the camera outside of my house and then controlled its zoom using my Mac and a Samsung Note 2. The camera zoom could also be controlled by JVC in New Jersey.
Remote camera background streaming
The camera’s firmware also supports an “FTP” mode. In this mode, clip(s) can be sent via FTP to a server. Both LAN and WLAN (Wi-Fi and cellular modem) are supported for data transfer. (Metadata can also be transferred to/from a server using FTP.)
First, issue System > Network and select either On(HDMI Off) or On(SDI Off). Second, to establish connections to up to four Meta-FTP servers and up to four Clip-FTP servers, you must define parameters for each server:
- System > Network > Settings > Meta Server or Clip Server.
- Set an alias for the server.
- Select Protocol: FTP, SFTP (encrypted using SSH), SFTP (encrypted using SSH), FTPS (encrypted using SSL or TLS with implicit transfer permission), and FTPES (encrypted using SSL or TLS with explicit transfer permission).
- Server name or IP address, such as 192.168.#.#.
- FTP port number (FTP:21, SFTP:22, FTPS: 990, and FTPES: 21).
- File path for the location of the data.
- Server Username.
- Server Password.
- PASV mode (On, if the camera is inside of a firewall).
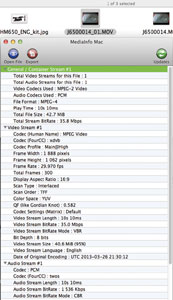
Figure 5. 35Mb/s MPEG-2 proxy video parameters;
To transfer clips, enter Media mode by a long press of the MODE button. Now you can select a clip by locating it and then pressing LOLUX/3 button to enable the Action menu. Select FTP Upload > This Clip. (You can also select a range of clips for upload.) A progress bar will appear while the transfer is performed.
My experience indicates that only an LTE connection is fast enough to transfer HD media. Figure 5 shows the nature of an HD clip that has been transferred to a server in New Jersey.
Figure 6 shows the QuickTime playback of a WEB format clip that has been transferred to the server.
Live camera streaming
To initiate real-time streaming to a server:
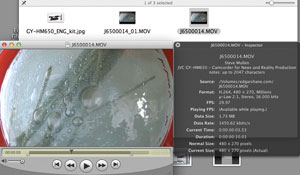
Figure 6. H.264 480 x 270 WEB clip
- System > Network and select either On (HDMI Off) or On (SDI Off).
- System > Network > Settings > Live Streaming Set to On.
- Set Resolution to 1920 x 1080 at 59.94i/50i or 1280 x 720 at 59.94p/50p/29.97p/25p. (Note 23.98p is not supported.)
- System > Network > Settings > Live Streaming > Type. Set to MPEG2-TS/UDP (default) or MPEG2-TS/TCP.
- System > Network > Settings > Live Streaming > Destination Address. Set IP address and host name for the destination.
- System > Network > Settings > Live Streaming > Destination Port. Set network port.
- System > Network > Settings > Connection Setup > Wizard. Define the settings for the cellular modem.
To broadcast a live stream, it must be decoded and processed appropriately to obtain 1080i or 720p video. This is accomplished by a hardware device that connects to a network and outputs HD video.
—Steve Mullen is the owner of DVC. He can be reached via his website at http://home.mindspring.com/~d-v-c.
Get the TV Tech Newsletter
The professional video industry's #1 source for news, trends and product and tech information. Sign up below.
