Lighting a Set With Minimal Adjustment, Maintenance

In the April 1 issue of TV Technology, I visited the subject of "general lighting," particularly as it is applied to a multiple-camera shoot. The article outlined a method to provide lighting that required the minimum of adjustment and maintenance, one which would be acceptable photographically, but not necessarily of award quality.
This month, I revisit the subject with a second, more sophisticated case study, demonstrating the same principles with a distinct and finished result.
The situation was as follows: A large number of short dramatic segments were to be shot over a two-week period. As envisioned by the creative staff of the significant religious organization behind the production, all the action was to take place in a 1950s-style setting—the conference room of an advertising agency. The presentation would be very much in the manner of "Mad Men."
The shows were to be staged in the unused warehouse space at the organization's administrative office building. The space was ideal in that it could easily contain the single set with space for control equipment and other service areas, and had the necessary ceiling height and attachments points (although roof loading was limited).
PRODUCTION
It was important that the shows be shot quickly, with minimum setup time in order to be as efficient as possible. In addition, in-house staff was to be used for the daily operation of the production. The staff, although limited in number, is not lacking in experience and talent.
To take advantage of the staff's capabilities, it was decided to shoot single-camera using a Canon 5D Mark II still camera. This turned out to be an excellent decision. By using this approach, the crew was not only able to get the coverage easily due to the camera's mobility, but was also able to introduce filmic quality in HD. Again, the goal of the lighting design was high picture quality with little or no adjustment necessary from setup to setup.
SCENIC AND STAGING

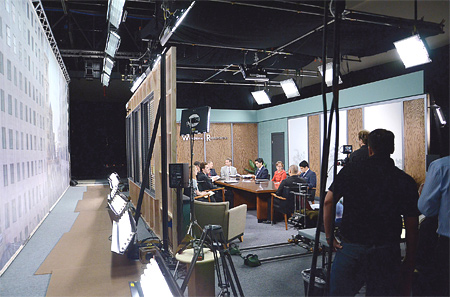
Fig. 1: On the set there were two sets of four four-lamps, 55-watt twin tube fluorescent fixtures placed just above each long wall. As you can see in Fig. 1, the set was a conventional rectangle with dimensions of approximately 16-by-25 feet. The fourth wall does not exist as is common in multi-camera production.
Conveniently, the script dictated that we were never to see the face of the actor in the foreground chair. Therefore, no coverage was required to establish that this wall was necessary. This did simplify things.
In preproduction, careful attention was directed to choosing the proper reflectance values for the set, as the brightness balance of the scene could not be obtained from the lighting. (This was due to the difficulty of getting precise control when using diffuse light sources.)
To illustrate, the value of the green walls and header was chosen to have a reflectance of about one-half of face brightness—a mid-exposure gray (think 18 percent). The average reflectance of wood paneling was about the same reflectance as the walls. However, the shine was removed by the scene shop to eliminate the frustrating problems that would occur if it were left as a specular surface.
The plastic "white" panels, when unlit, have a reflectance slightly above the 30-percent face reflectance, so that when lighted from behind, they will end up near system-white, but not saturated (see "Light Boxes and Such," TV March 2, 2011).
LIGHTING APPROACH
The lighting was straightforward. All units were balanced for tungsten color temperature. Observe in Fig. 1 that there were two sets of four four-lamps, 55-watt twin tube fluorescent fixtures (ParaBeam by Kino Flo), placed just above each long wall. There is one additional unit mid-stage facing the narrow table end, making a total of nine.
The units were suspended so that they were as low an elevation as possible, nearly touching the tops of the walls, which were 10-feet high. To complete this front lighting, two "bar-fly" units were placed at the end of the fourth wall opening at just above standing eye level.
To make this setup work, it was important that all these units had self-contained dmx-controlled dimmers. They were remotely controlled by a very basic two-scene present console. There was no dimmer rack required as all units to be dimmed had self-contained dimmers.
The drop was front lighted from both top and bottom with quad eight-foot fluorescent units. These were not dimmer-controlled as it was felt that the drop illumination would actually determine the exposure level.
As the front-light instruments were adjustable, setting their output would provide fine tuning to the lighting balance. It was also rationalized that the drop, to appear as a convincing daytime exterior, would be about two stops above the interior lighting exposure. The backlighting on the Plexiglas panels, the doorway backing wall and such, would all be adjusted to balance to this illumination value.
In keeping with the necessity for convenience, these background instruments were stand-mounted, dimmer-controlled Kino Flo "Diva" units. As this was an all-fluorescent plan (excluding the table lamp and other practicals), color temperature variation due to dimming was not an issue. In fact, no gel was used at all in the rig.

Fig. 2: The close-ups illustrate the quality of the final result.
In Fig. 2 the close-ups illustrate the quality of the final result. The actual average exposure level was about 40 foot-candles. This amount was obtained by using just one-half of the Para-beam's output. The exposure value (ISO) of the camera was adjusted to operate the camera near its widest aperture to narrow the depth of field as much as possible. The assumption that there would be no lighting adjustments required throughout the shooting period proved to be correct.
THE IMPORTANCE OF HD
There is one particular and important point that should be added in conclusion. Before "high definition," using a general lighting method as illustrated here was never pleasing under the lower resolution of "standard" definition. In fact, one of the traditional methods by which apparent resolution of standard definition was seemingly increased was by increasing lighting contrast and highlights. This is difficult to attain in a general lighting scheme because of the inherent flatness of the lighting.
Therefore, in applying a general lighting approach we must accept these compromises, counting on the resolution of the HD image and controlling the reflectance of scenic elements to create a satisfying look.
However, this does not mean your lighting need be flat at all times. When the circumstances are appropriate, do call upon your more dramatic lighting skills. After all, your creative contribution may add the perfect, final finishing touch.
Bill Klages would like to extend an invitation to all the lighting people out there to give him your thoughts at billklages@roadrunner.com.
Get the TV Tech Newsletter
The professional video industry's #1 source for news, trends and product and tech information. Sign up below.
