Now, For Something a Little Different
Many times the lighting designer is called upon to supply information related to, but not necessarily directly concerned with, his job. To explain his design, he may be asked to provide renderings, sketches, drawings and so on that can be used to visualize a result.
It is usually not the lighting designer who needs this aid; rather, it is the producer, production manager, even the artist who feels the need for enlightenment and confirmation.
In this month's article, I am going to address one such aid—showing camera views. These views are not to be confused with the extremely unrealistic renderings that always seem to appear in the early preparations for production and are never a representation of what the camera will actually see. I am going to outline a very straightforward way to deliver reality.
SKETCH-UP
Sketch-Up, a very popular 3D modeling program offered by Google, has been around for a few years. There is a free version as well as a more complete version called "Sketch-Up Pro."
The Pro Version 8 has the ability to import a more complete list of drawing file types. An add-on to Sketch-Up called "Film and Stage Plug-in for Sketch-Up 5" is also required. Don't be deceived by the version number as it will install properly in the current version of Sketch-Up.
Using this program gives you the ability to provide accurate camera views from any designated position, any choice of lens and, most importantly, in nearly all camera formats—still, film and video from 16mm to digital to large format. The plug-in should be added to Sketch-Up prior to proceeding.
THE BASIC METHOD
The first requirement is to make a 3D model of your production. This is the one area in which some skill is required—that of being proficient in a 3D drawing application. I use AutoCAD (Vectorworks works as well).
I have found the easiest and fastest 3D model to create is a solid model, which is constructed using geometric solids. Although it is possible to construct a solid model in Sketch-Up, I discourage this as it is much faster and more accurate in a full drawing program.
In most cases, if the lighting design is of some scale, it will be documented in a program like AutoCAD or Vectorworks anyway. The transition from 2D to 3D solid modeling is easily mastered if you are adept in one of the advanced drawing programs.
One practical hint: To locate camera positions more easily, place some type of mark in the 3D drawing on the plane representing the floor of your model before exporting it into Sketch-Up.
To make your views more realistic, you will have to obtain some 3D people that will look relatively lifelike in the environment of your camera views. Search the various online libraries for figures in the file format of your 3D drawing. These figures will then be positioned in appropriate locations in your 3D drawing model before importing the file into Sketch-Up.
THE NEXT STEP IS EASY

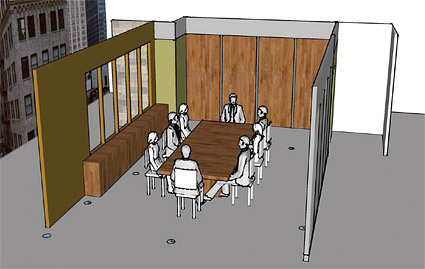
Fig. 1: Sketch-Up overview of 3D model showing set, people and camera marks Upon completion of your Solid Model, open up Sketch-Up. (Note: I will assume that you played a little with Sketch-Up and have progressed to the point where you have not only created a simple template for all your drawings, but also have some familiarity with how the program works by running through the tutorials.) At this point, direct Sketch-Up to file>import your 3D .dwg model (for the purposes of this discussion, I assume that you are in AutoCAD) and, magically, the 3D model appears.
PLACING THE CAMERAS
Before positioning your cameras, make sure that you are in perspective mode by selecting camera>perspective from the menu. Now, choose the camera by selecting Tools>Advanced Camera Tools>Select Camera Type>.
For my example, I selected Digital>2/3 Video Sensor Area, which happens to be 16:9 if you check the text file cameras.csv that creates the camera type list. I would not suggest wasting your good time by bothering with tools>advanced camera tools>create camera as all that does is place a 3D camera representation into your sketch-up model for every camera location.
If you have a lot of camera views, there will be a whole group of "satellites" floating around in your drawing, accomplishing little. To place the camera, make a wide view (see Fig. 1).

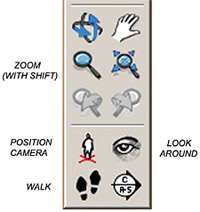
Fig. 2: Sketch-Up toolbar Select "Position Camera" tool (see Fig. 2); let the cursor find the snap point on one of your camera marks, and click. This places your camera elevated above the mark at the height indicated in the bottom right text box, the "Measurements Toolbar." You can enter any height in this box or use the default of 5 feet 6 inches.
Be aware that the direction the camera will be facing is arbitrary. To pan the camera, select the eye icon ("Look Around") and click and drag to pan the camera until you approximate the direction you desire. The Camera position will not change.
FINE ADJUSTMENTS
To set the shot size, we will adjust the camera's field of view. In order that the camera's position remains the same, we select the "Zoom" icon and—this is important—hold down the shift key. As you click and drag, it will increase or decrease the angle of view as you move the mouse and indicate this angle in the Measurements Toolbar. For slight framing adjustments, go back to the "eye" and make your pan or tilt adjustments.
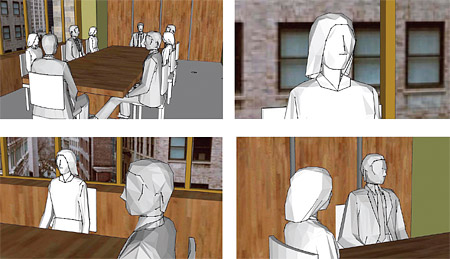
The Sketch-Up graphics in Fig. 3 show examples of some shots that were made in the manner described.
LENS FOCAL LENGTHS

Fig. 3: Examples of Sketch-Up camera views One thing that's not provided for you is the focal length of the lens. You can do the geometry and calculate the fields of view for typical focal lengths for the image size in the format that you have chosen. Some of the lens manufacturers have tables available that will give you this information.
Probably, a more useful approach is to tabulate a list of width angles that are typical for very wide, wide, medium, close-up and telephoto focal lengths for the camera format you have chosen.
This rapid-fire introduction to creating camera views is intended to demonstrate and spark your interest in the use of Sketch-Up as a useful addition to your tool kit. So, have fun experimenting, and if you get stuck, please do not hesitate to take advantage of my invitation below.
Bill Klages would like to extend an invitation to all the lighting people out there to give him your thoughts at billklages@roadrunner.com.
Get the TV Tech Newsletter
The professional video industry's #1 source for news, trends and product and tech information. Sign up below.
